Become A Better Photographer Today! – Understand & Practice Depth Of Field “Bokeh”
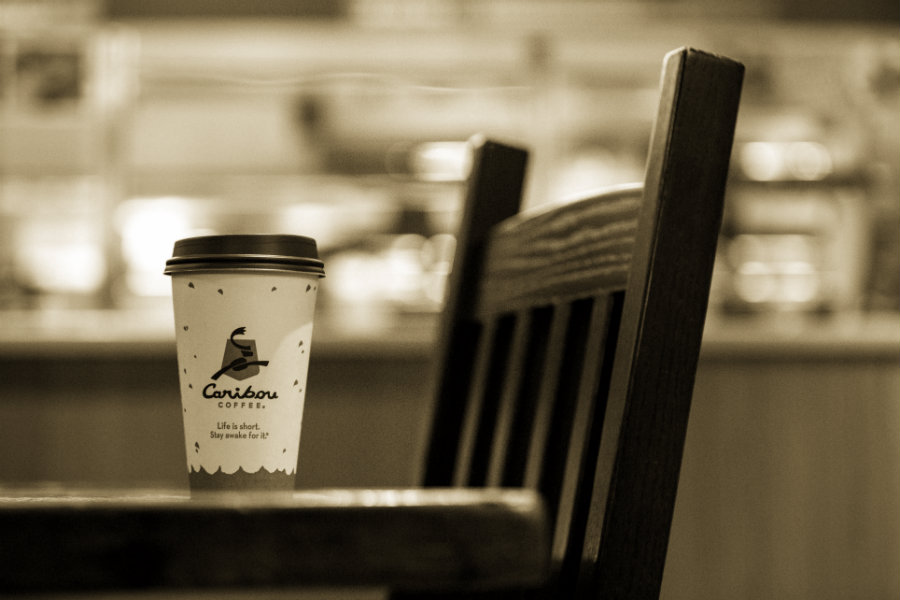
People typically love images with the “Bokeh” effect. That’s when the backgroud of an image is blurred. It’s created through understanding depth of field (DOF).
Controlling depth of field (DOF) is typically the key difference between professional images vs. amateur images. DOF is controlled by thinking through the results that you want to achieve vs. letting the camera think for you. Get your camera off the “P” mode and learn more about depth of field.
Shallow depth of field (DOF) is often controlled by the lens aperture setting to a lower number (f/2.8) setting causing the background to be more blurred (out of focus) thus causing the in focused subject to pop out more and a higher number (f/22) setting causing the background to be more in focus. The reason that I said “often controlled” is because f/stop alone is not the only factor. There are other variables to how shallow the DOF becomes.
Depth of field is also changed by the focal length along with distance between the subject and camera and the subject and background. For example, standing 20 feet from the subject with a 50mm f/1.4 lens set to f/2.8 will have a far different look than being 20 feet from the subject with a 70-200mm Zoom set at the 200mm focal length and f/2.8. To really get a feel for DOF, you should shoot WIDE OPEN with different lenses.
Wide open refers to the maximum opening on your lens: f/1.8, 2.8, 3.5 and 4.0 are some fairly common lens openings depending on whether the lens is a consumer lens, prime lens or zoom lens. But as a general rule, these numbers are somewhat typical. There are f/1.2 and f/1.4 prime lenses and there are f/5.6 lenses. The key is to see what happens with your lens wide open.
In addition, try testing the distance from the camera to the subject and the subject to the background. You should try multiple variations of this scenario. Here are just a few to consider:
1) 5 feet from camera to subject with subject being 5 feet from the background.
2) The same setup as above but move the subject 10 feet from the background. Then, try having the camera and the subject being 10 feet from each other with the background being 5 feet away. Just keep mixing it up and taking notes.
3) Now try the same thing above with a different lens. If you only own one lens, then get very familiar with how that lens works with your DOF. A kit lens at 18mm vs. 55mm will make a difference based on the varying f/stop of the lens at wide open and 1 and 2 above. Testing is key, but depth of field is something that you’ll want to master to give your images a different look.

f/2.8 with a 70-200mm Lens – The focal point was text on the coffee cup. The look is referred to as “Bokeh.” That’s Japanese for BLUR.
David Williams
Latest posts by David Williams (see all)
- How Will AI Change Professional Photography? - February 2, 2025
- Family Photographers vs. Commercial Photographers: Exploring the Differences in Approach, Purpose, and Technique - February 2, 2025
- Black and White Film Shot Of Our Golden Retriever: Trigger - February 2, 2022
- North Carolina Snow Images Shot In Franklin County - January 22, 2022
- Taking A Leap Of Faith: Hiring Your First Employee As A Creative - January 21, 2022


